[Tutorial] Creating Extensive PowerShell GUI Applications – PART 2

Applies to Visual Studio, Tool-Making
Requirements: Visual Studio, ConvertForm (Module)

Introduction

This is part 2 of the tutorial- if you haven’t read part 1, you can do so here.

In the last post, we covered creating a GUI in Visual Studio, converting that to a .ps1 PowerShell script, and working with a few of the controls on the form. In this article I’d like to get more into the tool-making aspect of GUI development to help add real value to the applications you make.

One of the main reasons for creating a GUI instead of a regular script or module is to simplify the user input. We’re going to start with fields, how to utilize that data, as well as displaying and manipulating data in the DataGridView format. We’re going to need to edit our Visual Studio design form to add these new controls.

Note: Any time you convert your form from designer.cs to .ps1, it will overwrite “Form1.ps1” in the destination folder. Be sure to rename your previous file. Since we don’t have too much code to begin with, we’ll move what we have to the new form1.ps1.

Designing the form

I’m going to show an example of a combobox, textbox, masked textbox, and a multi-line textbox. I’m also going to show how to dynamically add content to a textbox.

This is the form for the fields tab:
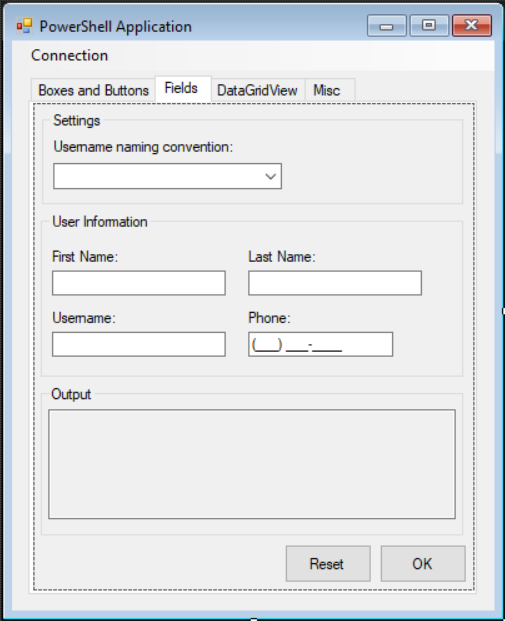
In this tab, I have the following controls:

  • 3 Group Boxes
    • GBsettings, GBuserinfo, GBoutput
  • 5 Labels
    • LBconvention, LBfirstname, LBlastname, LBusername, LBphone
  • 1 Combobox
    • CMconvention
  • 1 Masked Text Box
    • MTBphone
  • 3 Text Boxes
    • TBfirstname, TBlastname, TBusername
  • 1 Multi-line Text Box
    • TBoutput
  • 2 Buttons
    • BTreset, BTconfirm

Something to note here- the multi-line text box is just a standard text box with the multi-line parameter set to “True”. You can do this in Visual Studio here:
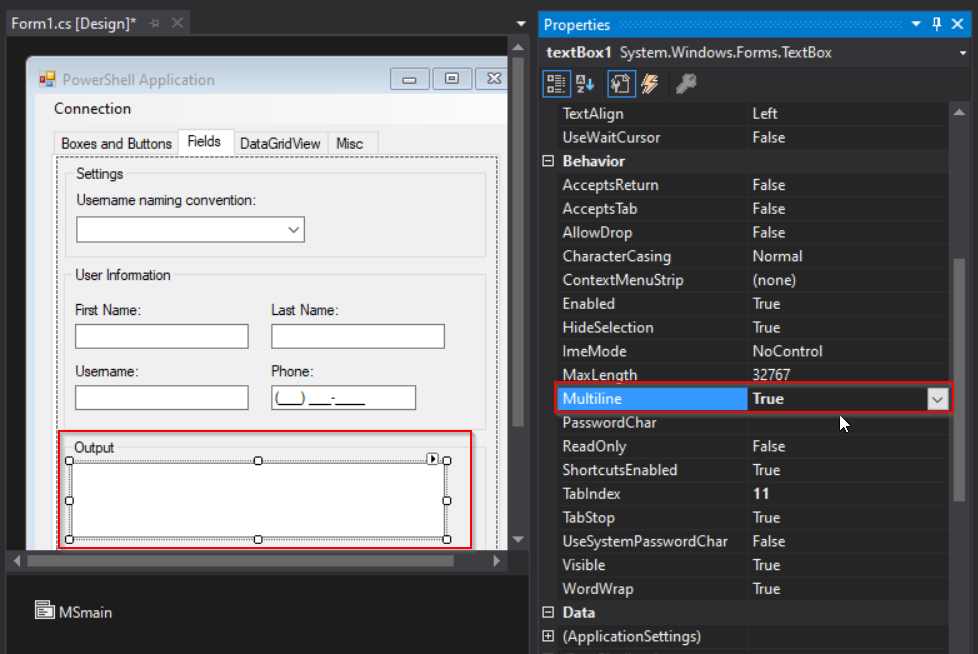
Note: I also set this multi-line text box to Read Only.

Comboboxes

Now that we have our form laid out, I’ll explain what the goal is here. We’d like to have a list of naming conventions for the username to auto-generate. The options we will have are:

  • First Initial, Last Name
  • Full Name
  • First Name, last 4 of phone
  • None

To begin working with this, we’ll need to add these options to the Combobox. If you haven’t already, convert your design to a .ps1 using Convert-Form. (Don’t forget to rename your old Form1.ps1.)

Below is all that is needed to populate the combobox. I included the combobox code for context.

#
# CMconvention
#
$CMconvention.FormattingEnabled = $true
$CMconvention.Location = New-Object System.Drawing.Point(9, 41)
$CMconvention.Name = "CMconvention"
$CMconvention.Size = New-Object System.Drawing.Size(183, 21)
$CMconvention.TabIndex = 1

# I added this:
$ConventionList = "First Initial, Last Name","Full Name","First Name, last 4 of Phone","None"
$CMconvention.Items.AddRange($ConventionList)
$CMconvention.SelectedItem = "None"

I set the $CMconvention.SelectedItem property to “None”. All this does is select that item when the form loads. If you don’t select anything, it will be blank on startup. If you don’t have a preference for the default item but want it to be populated, I suggest using the first index:

$CMconvention.SelectedIndex = 0

This alone is a powerful tool, since you can use any object as the source. Say if you wanted a combobox filled with all the running services, you could do something like this:

$ComboboxList = (get-service | where status -eq 'Running').name
$CMcombobox.Items.AddRange($ComboboxList)

Dynamically Change Textbox Values

For now, we’re going to stick with the naming conventions. But, as expected, selecting any of these items does nothing at the moment. We’ll need to tell the username text box how to react based on which combobox item is selected. We also want to add this content to the username box as we’re typing. To do this, I’m going to write up a function, which we will use anytime the text is changed in any of the other textboxes.

I like to add my functions near the top of the script, after the initial block of “New-Object” commands. This is my function:

function UpdateUsername {
	if ($CMconvention.SelectedIndex -eq 0){
		$TBusername.Text = ($TBfirstname.Text[0] + $TBlastname.Text).ToLower()
	}
	if ($CMconvention.SelectedIndex -eq 1){
		$TBusername.Text = ($TBfirstname.Text + $TBlastname.Text).ToLower()
	}
	if ($CMconvention.SelectedIndex -eq 2){
		$TBusername.Text = ($TBfirstname.Text + $MTBphone.Text.Split("-")[1]).ToLower()
	}
}

To walk through this function, here’s what happening. We’re using $CMconvention.SelectedIndex, and comparing it to a number. Rather than comparing the SelectedValue, “First Name, Last Initial”, we’re just specifying the selected index. If the first index (0) is selected, we know the “First Name, Last Initial” option is in that spot. Each option has it’s own way of generating the username. For “First Initial Last Name”, we take what’s in the First Name text box, grab the first character, and add that to the text in the Last Name field. “Full Name” just combines both First and Last name fields. “First Name, Last 4 Phone” splits the phone number at the dash (“-“) and uses the second half. I used this as an example of how the text value in the masked text box works. The text value includes the characters in the outline mask. You’ll also notice all the expressions are wrapped in brackets, with .ToLower() at the end. This just makes the username all lowercase. Also, we didn’t need to write anything for “None”.

To put this function to work, we’re going to call it anytime something that could affect it changes. We’ll have to do this in a few different spots, but to keep it simple, here’s everything that I’ve added:

# Update the Username field if the selected Index gets changed.
$CMconvention.Add_SelectedIndexChanged({
    UpdateUsername
})

# Update the Username field if the text in "First Name" changes.
$TBfirstname.Add_TextChanged({
	UpdateUsername
})

# Update the Username field if the text in "Last Name" changes.
$TBlastname.Add_TextChanged({
	UpdateUsername
})

# Update the Username field if the text in "Phone" changes.
$MTBphone.Add_TextChanged({
    UpdateUsername
})

Now if we run the script, we can see our changes in action.

More Buttons

The last thing to do on this page is add functionality to the OK and Reset buttons at the bottom. This is pretty simple, as all we need to do is update the text in $TBoutput.

Here’s what I did to update the information:

#
# BTconfirm
#
$BTconfirm.Location = New-Object System.Drawing.Point(277, 353)
$BTconfirm.Name = "BTconfirm"
$BTconfirm.Size = New-Object System.Drawing.Size(70, 31)
$BTconfirm.TabIndex = 11
$BTconfirm.Text = "OK"
$BTconfirm.UseVisualStyleBackColor = $true

# I added this:
$BTconfirm.Add_Click({
    $TBoutput.Text = "First Name: $($TBfirstname.text)
Last Name: $($TBlastname.text)
Username: $($TBusername.text)
Phone: $($MTBPhone.text)"
})

Note: Notice how the variables are used above. Since the output is just text, we want to specify that the whole $TBtextbox.Text is to be used as the variable. To do that, we wrap it in $() to avoid unwanted output.

Now the Reset button will clear all fields. Here’s how I did that:

#
# BTreset
#
$BTreset.Location = New-Object System.Drawing.Point(201, 353)
$BTreset.Name = "BTreset"
$BTreset.Size = New-Object System.Drawing.Size(70, 31)
$BTreset.TabIndex = 12
$BTreset.Text = "Reset"
$BTreset.UseVisualStyleBackColor = $true

#I added this:
$BTreset.Add_Click({
    $TBfirstname.text = $null
    $TBlastname.text = $null
    $TBusername.text = $null
    $MTBPhone.text = $null
    $TBoutput.text = $null
})

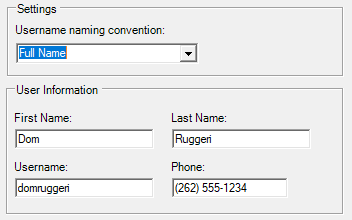
There we go, our Fields tab should now be complete. This is what the end result looked like:

Working with DataGridView

DataGridView is a great way to display retrieved data, and can be one of the more compelling reasons to develop a GUI instead of a standard script. But, tweaking them to work exactly as expected can be difficult, and is something I’ve put a lot of time into.

As always, let’s begin with designing our DataGridView in Visual Studio, and convert it to a .ps1 script file. (Remember to rename or move your previous Form1.ps1 file!)

Here’s what my DataGridView tab looks like:

List of controls on this tab:

  • 2 Group Boxes
    • GBservices, GBdata
  • 2 DataGridViews
    • DGVservices, DGVdata
  • 4 Labels
    • LBstatus, LBcount, LBcolumn1, LBcolumn2
  • 1 combobox
    • CMstatus
  • 3 Textboxes
    • TBcount, TBcolumn1, TBcolumn2
  • 3 Buttons
    • BTgetservice, BTadd, BTremove

The objective is to populate the fields in a DataGridView with the output from a command, and with user input. We’ll cover adding and removing rows, and using the Double Click function. There is also a fair bit of formatting we’ll need to do out of the gate. That’s what we’ll focus on first.

We’ll begin with setting the rows:

#
# DGVservices
#
$DGVservices.ColumnHeadersHeightSizeMode = [System.Windows.Forms.DataGridViewColumnHeadersHeightSizeMode]::AutoSize
$DGVservices.Location = New-Object System.Drawing.Point(6, 19)
$DGVservices.Name = "DGVservices"
$DGVservices.Size = New-Object System.Drawing.Size(329, 111)
$DGVservices.TabIndex = 0

# I added this:
$DGVservices.ColumnCount = 3
$DGVservices.ColumnHeadersVisible = $true
$DGVservices.Columns[0].Name = "Status"
$DGVservices.Columns[1].Name = "Name"
$DGVservices.Columns[2].Name = "Display Name"

This has added our column headers, but if we were to run our script without configuring the rest of the DataGridView properties, they will appear like this:

This looks awful, what’s even going on here?

By default, the DataGridView table is editable by the user, there are row headers, there’s a blank row after every entry- it’s a mess. Here’s what I add to almost all my DataGridViews, and tweak afterwards if needed:

$DGVservices.RowHeadersVisible = $false
$DGVservices.AutoSizeColumnsMode = 'Fill'
$DGVservices.AllowUserToResizeRows = $false
$DGVservices.selectionmode = 'FullRowSelect'
$DGVservices.MultiSelect = $false
$DGVservices.AllowUserToAddRows = $false
$DGVservices.ReadOnly = $true

To explain quickly what these do, (1) disabling the row header removes that first column with the asterisk. (2) AutoSize Columns set to ‘fill’ will do just that. (3) I don’t usually want users changing the row height, but that’s up to you. (4) If “FullRowSelect” is not the selection type, clicking on an item will highlight a single cell. This highlights the whole row. (5) MultiSelect allows you to ctrl+click as many rows as you need- we’ll set this one to false. (6,7) And lastly, we don’t want the users editing or adding to the DGV directly.

Ah, that’s much better.

Populate DataGridView with command Output

Now that our DataGridView is looking better- let’s get some data in it. If you couldn’t already tell, I’m going to use the Get-Service command to populate the DGV. Lets jump down to just below the DGV and set up our command.

To keep it simple, we’ll have the “Status” combo box have 3 options, Running, Stopped, and All. Item Count is going to be how many items we want to return. Lastly, the “Get Service” button will run our command.

Here’s how I set that up:

#
# CMstatus
#
$CMstatus.FormattingEnabled = $true
$CMstatus.Location = New-Object System.Drawing.Point(47, 134)
$CMstatus.Name = "CMstatus"
$CMstatus.Size = New-Object System.Drawing.Size(103, 21)
$CMstatus.TabIndex = 1

# I added this:
$StatusList = "All","Running","Stopped"
$CMstatus.Items.AddRange($StatusList)
$CMstatus.SelectedIndex = 0

The code above adds the options to the combobox, and selects the first index item as default.

Now we get into some real scripting. The rest of the action will happen when we click the “Get Service” button. We’re going to create another function for this. Here’s what I’ve added:

function UpdateServices {
	$DGVservices.Rows.Clear()
	if ($TBcount.Text -gt 0){
		$CountParam = @{
			'first' = $TBcount.Text 
		}
	}
	else {
		$CountParam = @{}
	}
	if ($CMstatus.SelectedIndex -ne 0){
		$Services = Get-Service | where status -eq $CMstatus.SelectedItem | select @CountParam
	}
	else {
		$Services = Get-Service | select @CountParam
	}
	
	foreach ($Service in $Services){[void]$DGVservices.Rows.Add(($Service).Status,($Service).Name,($Service).DisplayName)}
}

What this does is clears the existing rows in the DGV first. It then says, “If a count is specified, create a hash table to select the first of that many items.” Then, if the combobox is anything but “All” is uses the value of the selected combobox in a ‘where status -eq’ statement. Then, we add the Status, Name, and Display name for each item in each row. The [void] type is here because it will output the results to the prompt if it’s not. Now we jump down to our $BTgetservice, and add this function on a click.

#
# BTgetservice
#
$BTgetservice.Location = New-Object System.Drawing.Point(255, 133)
$BTgetservice.Name = "BTgetservice"
$BTgetservice.Size = New-Object System.Drawing.Size(80, 23)
$BTgetservice.TabIndex = 2
$BTgetservice.Text = "Get Service"
$BTgetservice.UseVisualStyleBackColor = $true

# I added this:
$BTgetservice.Add_Click({
	UpdateServices
})

Let’s run it, and see how it looks.

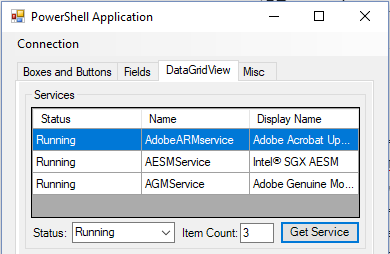
With “All” status, and no count, you can see on the scroll bar that the list is quite long. This should be all the services.
“Running” status with a count of 3 shows up correctly.
As does the “Stopped” with 1 count.

To make this a little nicer, let’s get rid of some of that extra space on the status. I added this to the $DGVservices properties:

$DGVservices.Columns[0].Width = 60

Note: This must be placed after the “$DGVservices.AutoSizeColumnsMode = ‘Fill’” line, otherwise the change will be overwritten. Now it’s looking even better:

With this under our belts, adding data from a user input should be simple.

Populating DataGridView with field inputs

First on our list is to pretty-up our DataGridView. No re-work required- let’s copy the properties from our other DGV.

#
# DGVdata
#
$DGVdata.ColumnHeadersHeightSizeMode = [System.Windows.Forms.DataGridViewColumnHeadersHeightSizeMode]::AutoSize
$DGVdata.Location = New-Object System.Drawing.Point(6, 19)
$DGVdata.Name = "DGVdata"
$DGVdata.Size = New-Object System.Drawing.Size(329, 144)
$DGVdata.TabIndex = 4

# I added this:
$DGVdata.ColumnCount = 3
$DGVdata.ColumnHeadersVisible = $true
$DGVdata.Columns[0].Name = "Property 1"
$DGVdata.Columns[1].Name = "Property 2"
$DGVdata.Columns[2].Name = "Username"
$DGVdata.RowHeadersVisible = $false
$DGVdata.AutoSizeColumnsMode = 'Fill'
$DGVdata.AllowUserToResizeRows = $false
$DGVdata.selectionmode = 'FullRowSelect'
$DGVdata.MultiSelect = $True # I set this to True this time
$DGVdata.AllowUserToAddRows = $false
$DGVdata.ReadOnly = $true

I like to keep streamlined processes out of the direct actions, so we’re going to set up two new functions. The first will add the content from the Column 1 and 2 field, then put our Username in the 3rd column. The other function will remove the selected rows. Here’s the add data function:

function AddData {
	if (($TBcolumn1.Text -gt 0) -and ($TBcolumn2.Text -gt 0)){
		[void]$DGVdata.Rows.Add($TBcolumn1.text,$TBcolumn2.text,$env:USERNAME)
	}
}

This just says “If both fields have text, add the two fields and the username.” Let’s create the remove function right away.

Function RemoveData {
	$DGVdata.SelectedRows | foreach {$DGVdata.Rows.Remove($_)}
}

That was an easy one. Let’s add those functions to the click action for the buttons.

$BTadd.Add_Click({
	AddData
})

$BTremove.Add_Click({
	RemoveData
})

Now we’ll make sure it works.

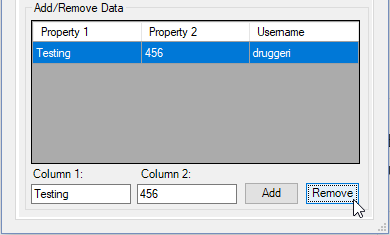
Add button is looking good.
And the Remove button is working too. Neat! Test this out with multiple rows selected on your own.

You may have wondered why we needed to make something as simple as that remove command into a function. That’s because we don’t do anything around here twice.

Adding Double Click to DataGridView

Let’s say we want to remove an item by double clicking it. Since we made the RemoveData function, it’s pretty simple- but it’s a little different than the normal Add_Click. I added this beneath our $DGVdata properties:

$DGVdata_OnDoubleClick = {
	RemoveData
}
$DGVdata.add_doubleclick($DGVdata_OnDoubleClick) # This adds the double click control.

Now we can double click to remove an item. Think of other functions you may want to happen with double clicking data. For fun, let’s add a function that restarts the selected service on double click in the first DGV.

# Create the function
function RestartSelectedService {
	Restart-Service $DGVservices.SelectedCells[1].Value
}

# Add the double click functionality
$DGVservices.add_doubleclick($DGVservices_OnDoubleClick)

# Run the function on double click
$DGVservices_OnDoubleClick = {
	RestartSelectedService
}

There’s a good bit of information in that last command. The $DGVservices.SelectedCells[1].Value means we are taking the value of the selected cells, in the second index position (0, 1, 2), which is our service name. Use this to run commands based on the data pulled from your DataGridViews.

Here’s what my DataGridView Tab looks like completed:

Conclusion

This was a long one. We learned how to enter, use, and manipulate fields, as well as add data, format tables, and manipulate DataGridViews. In the next article I’m going to cover some more obscure controls like Time/Date, Progress Bars, and maybe get into multi-window applications. If there’s something you’d like to know how to do in PowerShell using winforms, leave a comment, or send an email to dom@domruggeri.com.

Thanks for reading!

[Tutorial] Creating Extensive PowerShell GUI Applications – PART 1

Applies to Visual Studio, Tool-Making
Requirements: Visual Studio, ConvertForm (Module)

Introduction

Scripting, module creation, and tool-making are invaluable skills for any IT administrator- in IT Operations or elsewhere. The inherent problem with complex scripts and tools is the skills required to understand and use them. Scripting and automation has a primary goal of making processes easier and faster to complete, with minimal variance. But for lower-level IT technicians, or even those more advanced technicians who are new to a certain technology- the scripts and tools created may not have the ease-of-use that it really should have.

What better way to make your PowerShell scripts reach the masses -and its full potential- than to wrap it into an easy to use GUI Application? Of course if you’re deep into PowerShell scripts and tools, you’re likely one to shy away from user interfaces and live in the terminal, as I am. But we don’t always write scripts for ourselves, and those we share them with don’t always have the same skills as the author of the script. Today I’d like to help you bridge that gap in your team, and allow everyone to use scripts as simply as they should be to.

Requirements

To make GUI creation as simple as possible, I’ve adapted to using Visual Studio to design my forms, and convert them to PowerShell .ps1 script files. Visual Studio Community is free, and is available for download here.

Once we’ve designed our interface, we’re going to convert it to a .ps1 file, and begin creating the logic and PowerShell functionality. I came across a simple module, ConvertForm, that allows you to easily convert a Visual Studio designer file (x.Designer.cs) into a PowerShell .ps1 file.

ConvertForm is available for download at the link above, or to install directly from PowerShell, you can use the following commands:

$PSGalleryPublishUri = 'https://www.myget.org/F/ottomatt/api/v2/package'
$PSGallerySourceUri = 'https://www.myget.org/F/ottomatt/api/v2'

Register-PSRepository -Name OttoMatt -SourceLocation $PSGallerySourceUri -PublishLocation $PSGalleryPublishUri #-InstallationPolicy Trusted
Install-Module ConvertForm -Repository OttoMatt

These are the only requirements needed to create a running PowerShell GUI Application. Optionally, to take it a step further, when we’re completed we can compile our .ps1 into an executable .exe file using PS2EXE, or PS2EXE-GUI. This will really help finalize the application, and give it some versatility when our technicians begin to use it.

Getting Started

To jump right into it, we’re going to start with designing our User Interface. You should give this some thought before diving in, since the layout is important. Think about which inputs of your script will vary, which are static, what data should be displayed, etc. It’s easier to design the form right the first time, than to go back and move controls around to fit in neglected features.

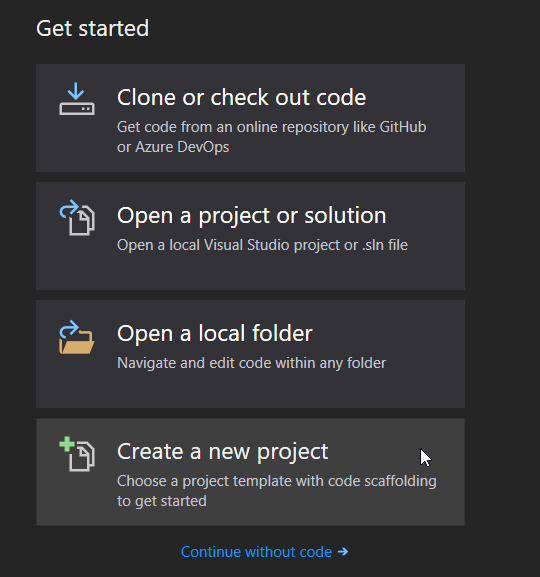
Open Visual Studio, and Create a New Project
Create a Windows Forms App (.NET Framework)

I’m not going to go too in-depth about how to design forms in Visual Studio, there are plenty of tutorials and videos that you can refer to if you’re just getting started. What I do want to do is outline my process for making the design as easy to interact with as possible once we get into scripting it.

Naming Convention

I’ve found it’s much easier to work with these forms in PowerShell if everything is named with a naming convention that makes sense. Personally, I make all control names begin with what kind of control they are, and what the data will be. For example, a textbox for a name will begin with “TB” for textbox, and “name” to represent it’s data.

I’m going to create a winform with as many controls as I’ve learned to use within it. This way, we can go through each control, and learn how to interface with them in PowerShell.

Winform Design

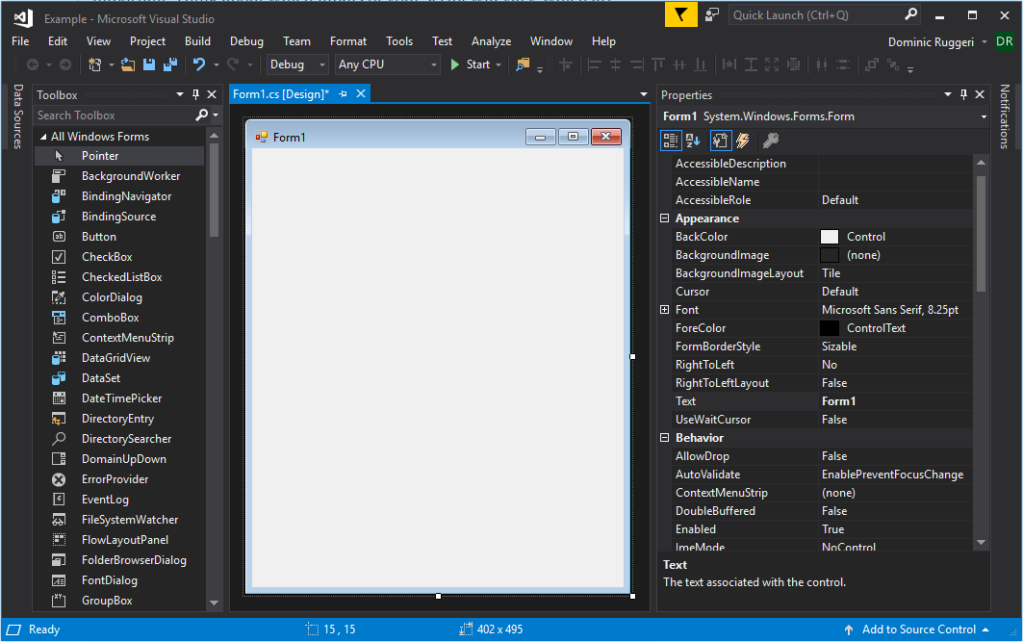
When we get started in Visual Studio, we should have a window similar to the one above.

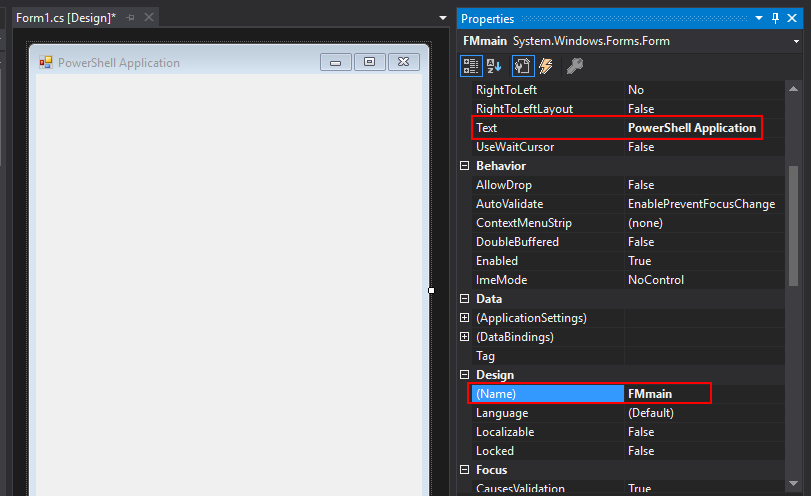
Don’t forget to give your main form a name, and a title. I’ve used FM to represent the form, and Main since this will be the main form.

To begin, I’m going to create a menu strip. We’ll have one item on the menu strip, and in that item will be two options.

In this case, I’ve named the menu strip MSmain. The “connection” item has been named MSIconnection, to represent the menu strip item. Then the sub-items are MSICo365, and MSICvmware. This represents Menu Strip->Item->Connection->o365/vmware.

To save real estate and demonstrate the Tab Control, we’re going to set up tabs for each group of controls we’ll be working with.

TCmain (Tab Control Main), TPboxesbuttons (Tab Page > buttons and boxes), etc.

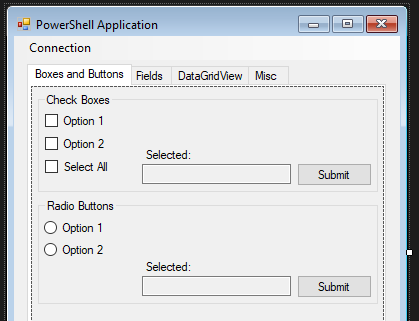
We’re going to fast forward and add a few controls to this “Boxes and Buttons” tab. When we’ve got some controls to play with, I’ll go through the conversion process, and we’ll get the form working in Powershell with the Menu Strip, Tabs, and Boxes/Buttons we’ve added.

Here’s what I’ve added:

  • 2 Group Boxes
    • GBcheckboxes, GBradio
  • 3 Check Boxes
    • CBoption1, CBoption2, CBselectall
  • 2 Radio buttons
    • RBoption1, RBoption2
  • 2 Labels
    • LBcheckboxselected, LBradioselected
  • 2 Read-Only Text Boxes
    • TBcheckboxselected, TBradioselected
  • 2 Buttons
    • BTcheckboxsubmit, BTradiosubmit

I’ve included the names so you can see the naming convention in action.

Tip: You can set the tab index for each control in Visual Studio before converting it to a .ps1. I’ve found this the easiest place to do it, as opposed to doing it in PowerShell. Just click on each control down the form, and increment the tab index. Using the Tab Index properly helps your application flow, and gives it a much more polished, professional feel.

This should be enough of a design to get started with. We’ll revisit the other tabs when we get the form functioning.

Converting design.cs to .ps1

In Visual Studio, your Project should be located in the following folder by default: c:\users\username\source\repos\projectname\projectname

In my example, the project is simply called “Example”. The Design file we need to locate will be found at: c:\users\dom\source\repos\example\example\Form1.Designer.cs

Tip: If you have trouble finding the design file, you can right-click the Form1.cs [Design] tab in Visual Studio, and select “Copy Full Path”, and it will copy to your clipboard.

At this point, we should have the ConvertForm module installed, and we can open up PowerShell. We need the path to the designer file, and the folder path to our destination .ps1 file. My command for that looks like this:

$Source = "C:\Users\Dom\source\repos\Example\Example\Form1.Designer.cs"
$Destination = "C:\Users\Dom\Scripts\"
Convert-Form -Path $Source -Destination $Destination -Encoding ascii -force

We should see a progress bar while this gets converted, and once completed, we should have a file called Form1.ps1 in our destination folder. Let’s open this up and start scripting!

Working with Form Logic

You should now be able to open your form1.ps1 file in your PowerShell script editor. To cut down on unneeded code, there are a few lines I typically remove from this generated .ps1 file. The first is right at the beginning. I usually remove these lines from the top:

function Get-ScriptDirectory
{ #Return the directory name of this script
  $Invocation = (Get-Variable MyInvocation -Scope 1).Value
  Split-Path $Invocation.MyCommand.Path
}

$ScriptPath = Get-ScriptDirectory

I also remove these lines from the bottom:

function OnFormClosing_FMmain{ 
	# $this parameter is equal to the sender (object)
	# $_ is equal to the parameter e (eventarg)

	# The CloseReason property indicates a reason for the closure :
	#   if (($_).CloseReason -eq [System.Windows.Forms.CloseReason]::UserClosing)

	#Sets the value indicating that the event should be canceled.
	($_).Cancel= $False
}

$FMmain.Add_FormClosing( { OnFormClosing_FMmain} )

$FMmain.Add_Shown({$FMmain.Activate()})
$ModalResult=$FMmain.ShowDialog()
# Release the Form
$FMmain.Dispose()

I replace that block at the end with a simple:

$FMmain.ShowDialog()

The removed code is just a fancy way to close and dispose of the forms. Feel free to leave it in if you’d like, but for simplicity’s sake, I take it out.

There may also be a couple functions meant to work with unhandled exceptions. I remove these as well. When I converted this example, I saw this function had been added, so I removed it:

function OnCheckedChanged_CBoption2 {
	[void][System.Windows.Forms.MessageBox]::Show("The event handler CBoption2.Add_CheckedChanged is not implemented.")
}

$CBoption2.Add_CheckedChanged( { OnCheckedChanged_CBoption2 } )

Now we’re ready to work with the actual form. If you run the script now, you’ll see you can already click through the tabs, click the menu strip and checkboxes. But none if it does anything just yet.

Checkboxes, and Textboxes

I’ll start with the “Select All” checkbox. I’ll find the section of code for the $CBselectall variable, and begin coding beneath that. I do this to keep the buttons functionality close the the rest of its defining properties. Here’s the $CBselectall code, and the code I added below it.

#
# CBselectall
#
$CBselectall.AutoSize = $true
$CBselectall.Location = New-Object System.Drawing.Point(7, 66)
$CBselectall.Name = "CBselectall"
$CBselectall.Size = New-Object System.Drawing.Size(70, 17)
$CBselectall.TabIndex = 2
$CBselectall.Text = "Select All"
$CBselectall.UseVisualStyleBackColor = $true

# I added this:
$CBselectall.add_checkstatechanged({
	if ($CBselectall.Checked -eq $true){
		$CBoption1.Checked = $true
		$CBoption2.Checked = $true
	}
	else{
		$CBoption1.Checked = $false
		$CBoption2.Checked = $false
	}
})

So what this does is add an action when the state of the check box is changed. It says, “When the Select All box changes, see if it is checked or not. If it is checked, check Option 1 and 2. If it has been unchecked, remove checks from Option 1 and 2.”

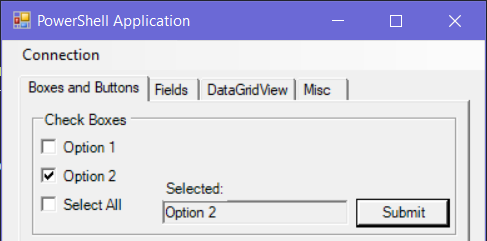
Next, let’s make the text-box display our selection when we click submit. This is a nice example of how to make various controls interact with each other.

Since the action is going to happen when we click “Submit”, I’m going to add this code beneath the $BTcheckboxsubmit code.

#
# BTcheckboxsubmit
#
$BTcheckboxsubmit.Location = New-Object System.Drawing.Point(259, 70)
$BTcheckboxsubmit.Name = "BTcheckboxsubmit"
$BTcheckboxsubmit.Size = New-Object System.Drawing.Size(75, 23)
$BTcheckboxsubmit.TabIndex = 5
$BTcheckboxsubmit.Text = "Submit"
$BTcheckboxsubmit.UseVisualStyleBackColor = $true

# I added this:
$BTcheckboxsubmit.add_click({
	$SelectedBoxes = @()
	if ($CBoption1.Checked -eq $true){
		$SelectedBoxes += "Option 1"
	}
	if ($CBoption2.Checked -eq $true){
		$SelectedBoxes += "Option 2"
	}
	$TBcheckboxselected.Text = ($SelectedBoxes -join (", "))
})

The code above adds an action whenever this “Submit” button is clicked. When it’s clicked, it creates an array called $SelectedBoxes. If Option 1 is checked, it adds “Option 1” to the $SelectedBoxes array. If Option 2 is selected, its adds “Option 2” to the array. After those checks are completed, the $SelectedBoxes array is joined with a comma, and added to the Text Box ($TBcheckboxselected) as text. This results in “Option 1, Option 2” if both are selected.

Radio Buttons

If you were able to get the check boxes working, the radio buttons should be no problem. One thing to know about radio buttons, is they must be in the same group box to function as intended. If they are, no logic is needed to de-select one when the other is checked. Because only one can be selected at a time, our code is a little more simple. We don’t need to create an array for this, and can simply say the text for $TBradioSelected is whichever button is selected.

#
# BTradiosubmit
#
$BTradiosubmit.Location = New-Object System.Drawing.Point(259, 76)
$BTradiosubmit.Name = "BTradiosubmit"
$BTradiosubmit.Size = New-Object System.Drawing.Size(75, 23)
$BTradiosubmit.TabIndex = 8
$BTradiosubmit.Text = "Submit"
$BTradiosubmit.UseVisualStyleBackColor = $true

# I added this:
$BTradiosubmit.add_click({
	if ($RBoption1.Checked -eq $true){
		$TBradioselected.Text = "Option 1"
	}
	if ($RBoption2.Checked -eq $true){
		$TBradioselected.Text = "Option 2"
	}
})

Menu Strip Items

The last thing I want to tackle in Part 1 is using menu strip items. I’ve found these most useful for connections or imports- things that need to be done, but don’t have a place in the real estate of the form itself. This is also where we’re going to dive into more PowerShell-related functions.

Menu strip items are simple, in that we really only need to specify an action if it is clicked. I have two options under the “Connection” item: Office365 and VMware.

For Office365, we’re going to pull up the O365 login prompt. There are a number of different ways to connect to Office365 via PowerShell, but I’m just going to use the Connect-MSOLService command from the MSOnline module.

We’ll begin by adding the following action when the MSICo365 button is clicked:

#
# MSICo365
#
$MSICo365.Name = "MSICo365"
$MSICo365.Size = New-Object System.Drawing.Size(124, 22)
$MSICo365.Text = "Office365"

# I added this:
$MSICo365.add_click({
	Connect-MsolService
	If ((Get-MsolDomain) -ne $null){
		$MSICo365.Checked = $true
	}
})

We could simply have “Connect-MsolService” as the only action for this button, but I also wanted to demonstrate the check box on these items. The code above will open the O365 login window, and once logged in, it will run a simple command to verify connectivity. If it succeeds, it will add a check next to the item. I use this to verify if you are connected.

Click on Office365 to connect
You’ll be prompted to sign in.
Once connected, you can click “Connection” to verify the sign in was successful.

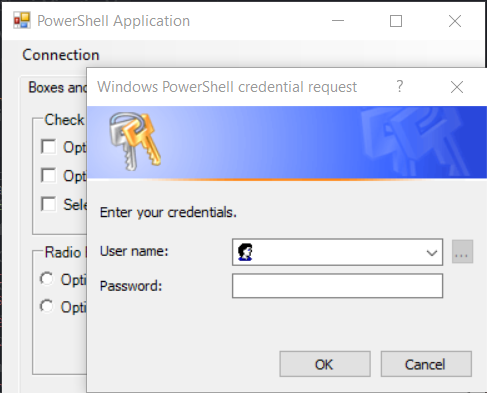
Another simple use for these options is to gather general logon credentials using PowerShells Get-Credential command. I’ll assume VMware uses your normal user account to get connected, so all we need to do is get those credentials and store them in a variable. Our code for that will look like this:

#
# MSICvmware
#
$MSICvmware.Name = "MSICvmware"
$MSICvmware.Size = New-Object System.Drawing.Size(124, 22)
$MSICvmware.Text = "VMware"

# I added this:
$MSICvmware.add_click({
	$Credentials = Get-Credential
})
Clicking the VMware button will now open a credential dialog, and save it to the $credential variable to be used later in the script.

Conclusion

That’s all it takes to get started writing PowerShell Applications with winforms. The examples in this post can be greatly expanded to facilitate larger scripts and complex functions.

In the next post, I’m going to cover how to use fields, and populate data in DataGridViews. Thanks for reading, and let me know if you have any questions- I’d be happy to help. You can send an email to dom@domruggeri.com, or post a comment below. Thanks again!

Interactive Script for Creating VM’s using PowerCLI

Applies to VMware, PowerCLI, Virtual Machines
Modules needed: vmware.powercli

As someone who works in a VMware environment, and likes the command line, PowerCLI is a lifesaver. Are you mad about the phasing-out of vSphere, forcing everyone to use the web-based vCenter manager? PowerCLI is the best way to get around it. I’ve been doing my research making sure I can do everything in PowerShell that I can in vSphere/vCenter. One of the most common tasks being creating virtual machines.

Before we get started, there are a few things you are going to need. First of all, you need a vCenter host. Got it? Great. Next, you need the module PowerCLI. This can be easily installed by typing install-module vmware.powercli.

In my current environment, we are utilizing Templates, Customization Specifications, and Tags.

  • Templates are pretty simple to make, since you can just convert a running VM to one. This is a good place to start.
  • In a future post, I’ll explain how to create Customization Specs using PowerCLI as well. Currently, I’m using OS Customization specs to set the network adapters, and join the machine to the domain.
  • Lastly, we use Tags to set when the VM will be backed up using Veeam.

Since there’s a good amount of code going into this, I’ve commented through the script to show you what’s happening. It goes like this:

Continue reading

Create Formatted xlsx Documents with PowerShell Outputs

Applies to PowerShell, Excel, Reporting
Modules needed: ImportExcel

Very frequently, I use PowerShell to extract data. Generating a list of users with expiring passwords, checking O365 licenses, finding stale Active Directory objects- you name it. Sometimes finding this information is easiest using PowerShell. But, if you need to give this data to your boss, or send it out to a manager, you need to extract it somehow. Export it to CSV? Gross!

Doug Finke has created a beautiful PowerShell module that has made the creation of Excel documents with PowerShell possible. (Without COM objects!) ImportExcel is my new favorite module- and I made it a little bit simpler to use for my needs.

I’ve set this script up as a function, because I want to be able to take what I’m currently working on, and quickly turn it into an Excel document. Here’s the code:

function xl {
  Write-Host
  Write-Host
  $getpath = Read-Host "File Name"
  $path = "c:\temp\" + $getpath + ".xlsx"
  [int]$sheetcount = Read-Host "Number of sheets"
  [int]$count = 0
  while ($count -lt $sheetcount) {
    Write-Host
    $sheetname = Read-Host "Sheet name"
    $command = Read-Host "Command"
    Write-Host
    Write-Host "Include Pivot Table?"
    Write-Host
    Write-Host "1) Yes"
    Write-Host "2) No"
    Write-Host
    $selection = Read-Host "Select"
    switch ($selection) {
      '1' { Write-Host "Working on it..." -ForegroundColor Yellow
        $ex = Invoke-Expression $command | Export-Excel -Path $path -AutoSize -FreezeTopRow -TableName $sheetname.Replace(' ','') -TableStyle Medium2 -WorkSheetname $sheetname -IncludePivotTable }
      '2' { Write-Host "Working on it..." -ForegroundColor Yellow
        $ex = Invoke-Expression $command | Export-Excel -Path $path -AutoSize -FreezeTopRow -TableName $sheetname.Replace(' ','') -TableStyle Medium2 -WorkSheetname $sheetname }
    }
    Write-Host
    Write-Host "Sheet Completed." -ForegroundColor Green
    $count = $count + 1 }

  Write-Host "Exporting to Excel..." -ForegroundColor Yellow
  Invoke-Item $path
}

What it does:

Continue reading

Copy User’s Groups to Another User

Applies to Active Directory, User Management
Modules needed: ActiveDirectory

This is a very useful script if you find yourself needing to add a user to all the groups another user is a part of. Typically, you could just copy the user in Active Directory to make the new user. But in this case, I was asked to do this for an existing user. There’s no simple way to do this within Active Directory, but this quick script gets it done.

The script asks for the user needing to be added, and the user to copy the groups from.

Import-Module ActiveDirectory
Clear-Host
$creds = (Get-Credential)
Clear-Host
$addedUser = Read-Host ("User to add to groups")
$copiedUser = Read-Host ("User to copy groups from")
Write-Host
Write-Host
Write-Host "Working on it..." -ForegroundColor Yellow
Write-Host
Write-Host
Get-ADUser -identity $copiedUser -Properties memberof | Select-Object -ExpandProperty memberof | Add-ADGroupMember -Members $addedUser -Credential $creds -Passthru | Format-Table -Property Name,GroupCategory,GroupScope,DistinguishedName -AutoSize

At the end of the script, the groups the user was added to are shown.

Send an Email with PowerShell

Applies to PowerShell
Modules needed: None

This is a fun little script I set up mostly to see if I could do it. It actually turned out to come in handy when I’m configuring email addresses and new mailboxes in exchange, and want to send a quick test email without changing windows.

The script asks for a recipient, a subject, and a body. It then confirms you want to send the email.

Note: The body is stored in HTML. This means if you want a line break, you need to type <br>in your line, as opposed to hitting ‘Enter’. 

You will want to change the “From”, “SmtpServer”, and “$Sig” lines to meet your needs. For the $sig variable, an HTML file containing your signature is expected.


Clear-Host
Write-Host "Send an Email" -ForegroundColor Yellow
Write-Host
Write-Host
$sig = Get-Content 
$to = Read-Host "To"
$subject = Read-Host "Subject"
$message = Read-Host "Message"
$body = $message + $sig
Write-Host
Write-Host
Write-Host "Message completed. Would you like to send?"
Write-Host
Write-Host "1) Yes"
Write-Host "2) No"
Write-Host
$selection = Read-Host "Select"
switch ($selection) {
'1' { Send-MailMessage -To $to -From  -Subject $subject -SmtpServer  -Body $body -BodyAsHtml
Write-Host "Message Sent." -ForegroundColor Green }
'2' { exit }
}


Add User to Distribution Group

Applies to Exchange, and O365.
Modules needed: Exchange, or Microsoft.Exchange.Management.ExoPowershellModule

This is a simple script that just asks for input on adding members to a distribution group. The reason I made this script was because I wanted to simplify this process for non-admin IT folks, and enter multiple users at a time.

To add multiple users, separate them with commas.
Example: Members: druggeri,tdanza,pporter


$dl = Read-Host "Distribution Group"
Write-Host
get-distributiongroup -identity $dl
Write-Host
Write-Host
$members = Read-Host "Members"
$members = $members.split(',')
foreach ($m in $members) {
  Add-DistributionGroupMember -identity $dl -member $m }
Write-Host
Write-Host "Confirmation:" -ForegroundColor Green
get-distributiongroupmember -identity $dl | Format-Table -AutoSize

At the end of the script, a confirmation is shown using get-distributiongroupmember on the entered group. This is just so you can verify your change applied, and that the correct users were added.